For beginner, the most difficult challenge in this journey lies in the art of fan making. So the most frequent asked questione is “how to make lash fans?”. With various fanning methods available, understanding each technique’s strengths and how to execute them properly will elevate your lash artistry to a next level.In this guide, we will introduce the most popular lash methods used in volume and mega volume lash extensions!
1. Pinching Lash Method
The Pinching technique is arguably one of the most widely used techniques for creating volume fans. It gives lash artists ultimate control, allowing for precise creation of symmetrical and even fans. This method works exceptionally well for thinner lashes, such as 0.03 or 0.05 mm.
How to do the Pinching Method?
- Pick up lashes: Start by picking up a small group of lashes from the strip with your tweezers. The amount you pick depends on how voluminous you want the fan to be.
- Tilt the tweezers: Pull the lashes slightly toward yourself at an angle, making sure to hold them steadily.
- Pinch the base: Use your thumb and index finger to pinch the base of the lashes while still holding them in your tweezers. As you pinch, the lashes will naturally start to fan out.
- Adjust the fan: If necessary, adjust the fan by gently releasing some tension or pushing the lashes into place.
- Dip and apply: Dip the base of the fan into a small amount of adhesive and apply directly onto the natural lash.
This method provides excellent control over the fan’s symmetry, size, and base width. It’s perfect for lash artists who prefer a hands-on approach and for clients who desire a defined, fuller lash look. The Pinching Method is best used with thin lashes to create light, airy volume sets.
Pros and Cons
The Pinching Method provides excellent precision, allowing lash artists to control the size and shape of each fan with great accuracy, which is ideal for detailed work. The pinched base also results in a stronger bond with natural lashes, ensuring longer-lasting retention. However, this technique can be time-consuming, as it requires more patience and attention to detail, making it slower compared to other fan-making methods like the Wiggle or Rolling techniques.
2. Shimmy or Wiggle Lash Method
The Shimmy Method, also known as the Wiggle lash method, is popular for its speed and consistency. In this technique, the lashes are fanned out while still on the strip, which allows lash artists to create symmetrical and uniform fans quickly. This method is highly efficient, especially when working on large volume sets.
How to do the Wiggle Method?
- Pick up lashes: With your tweezers, pick up a small group of lashes while keeping them attached to the strip.
- Wiggle the tweezers: Gently wiggle your tweezers back and forth to separate the lashes into an even fan.
- Pull off the strip: Once the fan has formed, carefully pull the lashes off the strip while maintaining the fan shape.
- Dip and apply: Dip the base in glue and apply directly to the natural lash.
The Wiggle Method is ideal for experienced artists who need to create large fans quickly without sacrificing quality. It’s often used for Russian and mega-volume lashes, where fans need to be wide and full.
Pros and Cons
The Wiggle lash method is one of the quickest techniques for creating lash fans and naturally leads to symmetrical results. However, while it’s highly efficient, it can be tricky for beginners to master and may require extra practice to perfect the technique.
3. Rolling Lash Method
The Rolling lash method is perfect for creating wide fans with excellent symmetry. This technique involves rolling the lash fan between your fingers, which allows the lashes to spread out evenly, creating a full, voluminous fan. It’s a great method for creating Russian volume sets.
How to do the Rolling Method?
- Pick up lashes: Start by grabbing a small group of lashes from the strip.
- Roll the lashes: Roll the lashes between your thumb and index finger. As you roll, the lashes will fan out evenly.
- Dip the base: Once the fan is formed, dip the base in adhesive and apply to the client’s natural lashes.
The Rolling lash method gives lash artists control over the fan’s width and symmetry, making it ideal for dramatic, wide fans. This method works best with 0.05 or 0.07mm lashes, as these thicknesses provide enough structure to hold the fan’s shape.
Pros and Cons
The Rolling Lash Method is great for creating wide, full fans, making it ideal for clients who want a more dramatic look. This method also ensures consistent fan shapes, even for beginners. However, it’s not suitable for thinner lashes, as thinner lashes may struggle to hold their shape well with this technique.
4. Sticky Dot Lash Method
The Sticky Dot lash method is an easy way to create fans, especially for beginners who are just starting to explore volume techniques. This method uses a sticky surface (such as a dot or pad) to hold the lashes in place as they fan out.
How to do the Sticky Dot Method?
- Place a sticky dot: Place a small sticky dot on your working surface.
- Pick up lashes: Use your tweezers to pick up a small section of lashes and place them onto the sticky dot.
- Fan out the lashes: The sticky surface will hold the lashes in place as you fan them out with your tweezers.
- Dip and apply: Once the fan is shaped to your liking, dip the base in glue and apply.
This method is simple and provides a stable base to work from, making it easier to achieve even, symmetrical fans.
Pros and Cons
It’s one of the easiest methods for beginners to master as the sticky surface provides stability while working on fan of lashes. However, this method can be slower than others, particularly for more advanced lash artists.
5. Lonely fan or Fan Off The Strip Lash Method
The lonely fan method is an excellent choice for any lash artist just starting out in the lash industry. This technique is quite straightforward, so if you’re a beginner, it’s a great idea to practice this method before moving on to more advanced techniques.
How to Do the Lonely fan Method:
- Place lashes back on the strip: Use your tweezers to select the desired number of lashes and set them apart from the others. Place them back on the strip, ensuring they are away from the remaining lashes.
- Roll the tips: Gently roll the tips over the base of the lashes to open them up, then adjust the spacing between the lashes to your preference.
- Dip and apply: Lift the fan and dip its base into the lash glue.
Pros and Cons
The lonely fan method is great for beginners due to its simplicity and quick application, allowing for precise spacing between lashes and boosting confidence. However, it has some drawbacks: it may not create as full a look as volume fans, can become repetitive with larger sets, and may not fully prepare artists for more advanced fanning techniques.
Other Factors for Perfect Lash Fans
Achieving perfect lash fans doesn’t rely solely on technique. There are additional factors that contribute to creating the ideal fan:
- Symmetry: Ensure that the spacing between each lash is even, as this will result in a more polished and professional look.
- Glue Control: Dipping the fan too far into the adhesive can cause it to close up. To maintain the fan’s shape, dip only the very base of the lashes into the glue.
- Tweezer Precision: Using the right tweezers is crucial for precise fan-making. Volume tweezers with fine tips are ideal for gripping and spreading lashes effectively.
- Lash Quality: High-quality materials allow you to master every lash method. Look for lashes that are soft, lightweight, and consistent in curl and thickness.
- Humidity and Temperature: Environmental conditions can affect the adhesive’s drying time and the overall fan formation. Aim for optimal humidity levels (around 40-60%) and a stable temperature in your workspace to ensure the best results.
- Lash Length Variation: Incorporating a mix of lash lengths within your fans can add dimension and texture to the overall lash look.
- Glue tape: Each lash fanning method will need suitable glue tape as glue tapes have different sticky levels and each of them suitable for certain lash diameter. For a quick guide on how to choose the right glue tape for each lash method, check out the video below:
Common Challenges in Fan-Making and How to Deal With Them
While creating lash fans, artists may encounter a few common challenges. Here’s how to deal with them:
- Fans Closing Up After Dipping in Adhesive: Make sure you’re only dipping the very base of the fan into the glue. Too much adhesive can cause the fan to close.
- Uneven Fans: Ensure that you’re picking up lashes in even amounts and holding the tweezers at the correct angle.
- Fans Not Opening: This could be due to the quality of the lash strip or tweezers. Check your tools and use proper technique when pulling the lashes toward yourself.
- Fan Bases Too Thick: Use thinner lash extensions, such as 0.03 or 0.05mm, for a cleaner base. You can also try pinching the base more tightly to create a smaller point.
Best Product for a Perfect Lash Fan
If you’re a lash artist, especially a beginner, mastering the lash fanning technique can feel overwhelming. Fanning requires precision, patience, and lots of practice. But what if you could skip the challenge and still deliver flawless, voluminous lash sets every time?
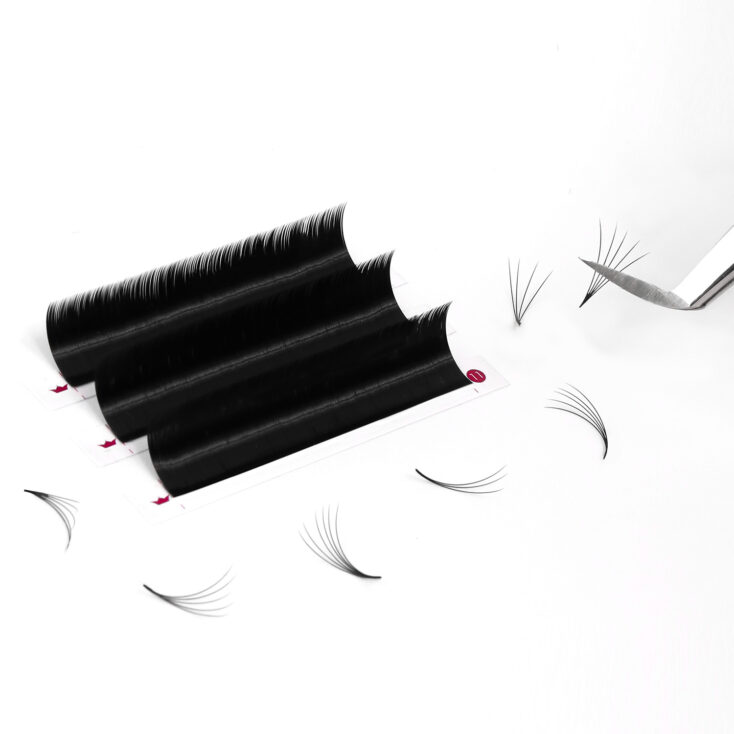
That’s why Premade Fan Lashes come into play. At Charmlash, we provide a solution that makes lash application fast, easy, and professional. No matter your skill level, our premade fans allow you to create stunning volume lashes in no time!
We offer a variety of premade fan lashes to suit different styles and preferences:


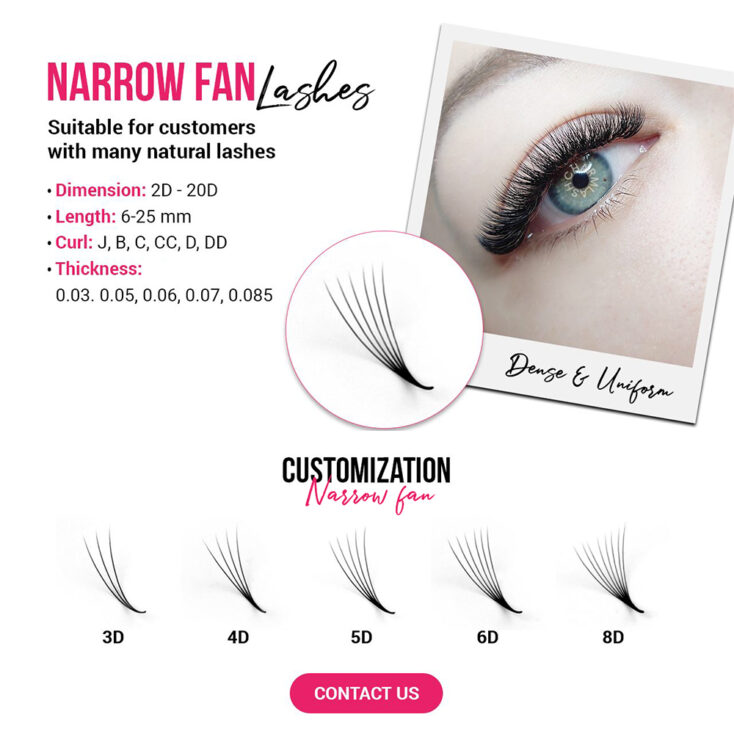
1. Premade Narrow Fan Lashes
Narrow fans create a dense, voluminous lash line with a pointy base for a seamless look and improved retention.
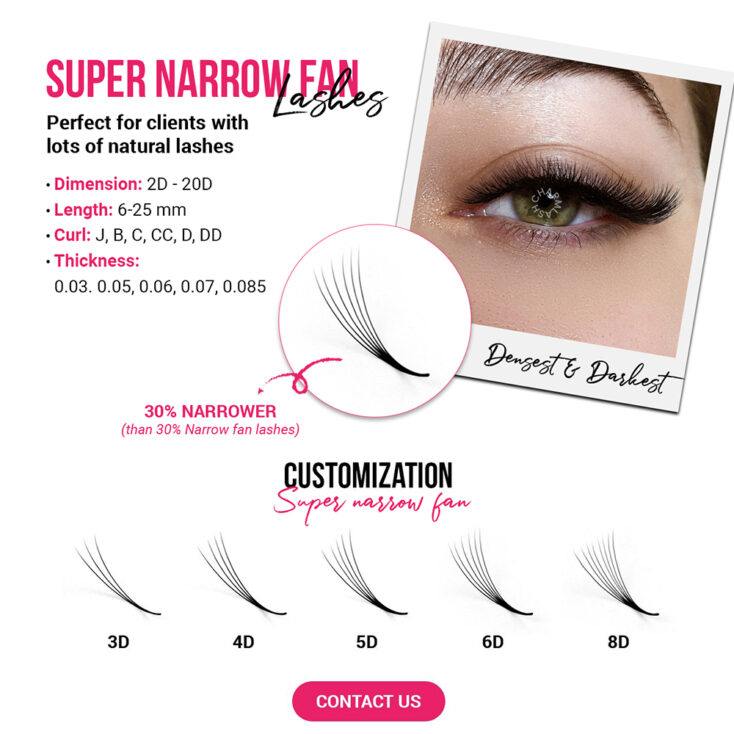
2. Premade Super Narrow Fan Lashes
Our Premade Super Narrow Fan Lashes are 30% narrower than standard narrow fans, offering the most uniform, dense, and voluminous lash effect.
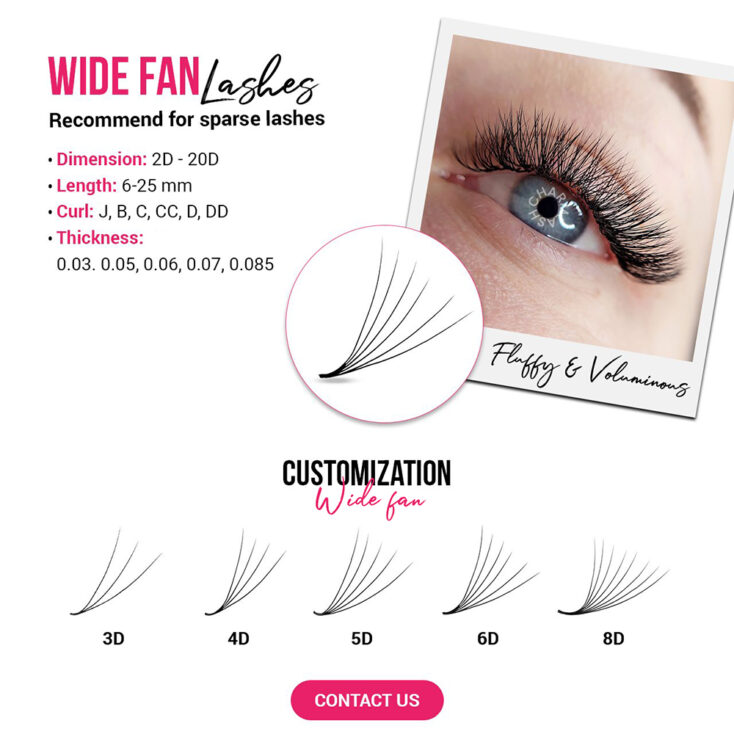
3. Premade Wide Fan Lashes
Premade wide fan lashes are a great option for clients with sparse lashes yet desire volume effect.
Premade fans are pre-bonded clusters of lash extensions that save you time and effort. Instead of manually fanning each set of lashes, you can simply pick up a premade fan and apply it directly to your client’s natural lashes. This is a game-changer for lash artists who are new to the industry, working on tight schedules, or just want to streamline their application process.
For more: Handmade fan lashes vs Premade fans : A comprehensive comparison for lash artists
Final Thoughts on Lash Methods
Choosing the right fanning lash method depends on several factors, including your experience level, the desired lash look, and your preferred technique. The Pinching, Wiggle, Rolling, and Sticky Dot Methods each offer their own advantages and are suited to different client needs and lash styles.
Mastering these lashing techniques is key to elevating your lash artistry and creating stunning volume sets that are tailored to your clients’ preferences. Take the time to practice each method and find the one that works best for you!
Follow us on Instagram for more helpful lash tips!
MAYBE YOU WANT TO KNOW MORE:
Unlock The Secrets To Create Perfect Volume Lash Fans
The Ultimate Guide to Russian volume eyelash extension
Classic Vs Volume Eyelash Extensions – Which Style Is Best For You?


